int32bit
公告
外部文章迁移完毕文章分类
最新评论
最新留言
友情链接
RSS
功能
热门文章
随机文章
存档
访问次数
linux chmod命令改进
chmod命令用于修改文件mode,即权限.有时我们需要递归处理,加上-R选项即可.但是有时我们需要这种情况: 普通文件和目录文件设置不同的mode. 最常见的情况是从windows下烤的工程项目要部署到linux下, 假设服务器是tomcat, 于是我们必须修改工程权限,要能cd进去,目录必须有可执行权限,但我们又不希望普通源码文件也加上莫名其妙的可执行权限.
下面我的脚本直接调用了chmod,只是多了几个判断而已! 实在不知道怎么写标题,改进还是改退? 或者根本不能称为改进,而是重新封装了下?
#!/bin/bash

declare -f op
declare -f showHelp

# 逐一处理文件
op()
{
	while [ "$#" -gt 0 ] # 还有待处理参数
	do
		file="$1"
		if [ ! -e "$1" ]
		then
			echo "$1 does not exists."
			shift # 处理下一个参数
			continue
		fi

		if [ ! -d "$1" ]
		then
			chmod -c "$filemod" "$1" || echo "chmod $filemod $1 fail!"
		else
			chmod -c "$dirmod" "$1" || echo "chmod $dirmod $1 fail!"
			if [ "$recursive" = "1" ] # 若递归,则继续递归调用op函数
			then
				for subfile in $1/*
				do
					[ -e "$subfile" ] || continue # 这个要注意,防止当不存在文件时,*不会展开
					op "$subfile"
				done
			fi
		fi
		shift #处理下一个参数
	done
}

# 显示帮助信息
showHelp()
{
cat <<EOF
usage: $0 [-r | -R] [-f filemod] [-d dirmod] file1 file2 ...
for example: $0 -r -f a+r -d a+x
EOF
exit 0
}
test()
{
	while [ $# -gt 0 ]
	do
		echo "$1"
		shift
	done

}
opt=0 # 记录参数选项个数
while getopts ":rRf:d:hH" arg
do
	case $arg in
		"h" | "H")
			showHelp
			;;
		"r" | "R")
			recursive=1
			((opt+=1))
			;;
		"f")
			filemod=$OPTARG
			((opt+=2))
			;;
		"d")
			dirmod=$OPTARG
			((opt+=2))
			;;
		":")
			echo "No argument value for option $OPTARG"
			exit 1
			;;
		"?")
			showHelp
			;;
		*)
			echo "Unkown error while processing options"
			exit 1
			;;

	esac
done

# 去掉选项参数
while [ $opt -gt 0 ]
do
	shift
	((opt-=1))
done

# 设置变量默认值
filemod=${filemod:-"664"}
dirmod=${dirmod:-"775"}
recursive=${recursive:-"0"}

# 主程序入口, 如果有文件需要处理,则调用op,否则直接退出
if [ $# -gt 0 ]
then
	op $@
else
	showHelp
fi
linux 错误流传入管道的几种方式
正常情况下当运行命令: command1 | command2 时,只能把command1标准输出传入command2 输入,即只能将标准流传入管道,但有时我们需要将错误流传入管道,就比较麻烦了。有以下解决方案:
- command1 2>&1 | command2 ,这样可以把错误流重定向到标准输入流,然后在传入管道。这样的问题是标准流和错误流混在一起了,这可能不是我们所需要的。
- 在bash、tcsh中直接支持将错误流传入管道,即 command1 |& command2,这样方法最方便,但不是所有shell都能够支持的。
- 先把错误流文件保存到临时文件中,在读取,然后重定向,即 command1 2>tmpfile && cat tmpfile | command2,这种方式健壮性比较好,但同时效率肯定比较低的。
当然或许有其他更好的方式,目前仅想到这几种方式。
ubuntu 网络配置(包括有线、无线、wifi)
首先不得不说ubuntu下的network-manager有多不好,往往出现dhcp无法获取ip,锐捷无法认证等一系列问题。于是很果断的卸载了。
linux下网络配置分为有线和无线。
有线配置的话,如果是dhcp,修改/etc/network/interfaces 文件,看起来想这样
auto eth0
iface eth0 inet dhcp
其中auto表示在系统启动时脚本会自动开启,eth0是网卡名,在终端上输入
sudo ifconfig -a
可以查看所有计算机存在的网卡。具体查看man手册。
有时尽管我们设置了dhcp,但依然获取ip失败,这时可以运行dhclient命令
dhclient eth0 # ech0 替换成网卡名
然后再运行ifconfig查看是否正确获取了ip。
如果是静态ip,则看起来想这样
iface  inet static
address 192.168.1.1
netmask 255.255.255.0
当然要自启动也要在前面加入auto eth0. 有时需要配置网关和DNS,只需在下面加上gateway address 和 dns-nameservers address1, address2, DNS也可以在/etc下修改resolve.conf文件设置,看起来像这样:
nameserver 8.8.8.8
nameserver 202.196.64.1
注意:所有的配置都需要重启网络才生效!
如果网卡没有打开,需要运行sudo ifconifg eth0 up (eth0替换成网卡名)。
自此有线配置基本完成。
下面看看无线网络的配置。
首先无线网络,首先要开启无线(硬件开启),有时硬件开启时运行ifconifg也打不开,这可能因为是软件禁止了。运行:
rfkill list
可以查看软件禁止/开启列表,需要开启,只需运行
rfkill unblock index | type
# index 就是rfkill list 列表的编号, type 对应名字,比如wifi
然后配置/etc/network/interfaces 文件,与有线配置类似。
如果需要使用wifi,可以安装wifi-radar,这是个图形化工具。请确保wifi硬件和软件都已正常开启。
还有一个无线配置命令是iwconfig,请man之。
浮点数的奇怪现象
double d = 1.2 - (long)1.2;
d *= 10;
printf("%d\n", (int)d);
面试时遇到这个问题,问输出是多少? 大多数人会立马回答输出是2,但实际上输出并不是凭空臆想的结果。 其实我们都知道,浮点数在计算机中只能近似表示,存在误差,计算机中根本不存在确切的0.0,即说明我们不能直接比较浮点数是否等于0.0,即
#include <stdio.h>
int main(int argc, char **argv)
{
	double d = (1.1 - 1.0) * 10 - 1;
	printf("%lf\n", d);
	/* d = 0.000000 */
	if (d == 0)
		printf("true\n");
	else
		printf("false\n");
	return 0;
}
会返回false! 而应该使用fabs(f1, f2) <= precision 进行比较,注意这个precision是绝对误差,当f1和f2在这个绝对误差附近时可能出现问题!所以开头那段程序的输出可能是2,也可能是1!
linux下pdf文件合并工具
pdfjoin [OPTION [OPTION] ...] [SRC [PAGESPEC] [SRC [PAGESPEC]] ...]
堆排序c语言实现
昨天面试,5分钟手写堆排序,虽然以前写过这个算法,但面试时有点紧张,主要是用笔写,而且面试官一直盯着。。。。
回来自己再写了遍。
#include <stdio.h>
#include <stdlib.h>
#include <time.h>
#define N 20

static inline int swap(int *a, int *b)
{
	int t = *a;
	*a = *b;
	*b = t;
	return 0;
}
/* 调整当然节点 */
static int adjust(int *a, int i, const int n)
{
	int lchild = i * 2 + 1, rchild = i * 2 + 2; /* 数组从0索引,因此左孩子索引为i * 2 + 1 */
	int min = i; /* 保存当然节点、左右孩子节点的最小值索引 */
	if (lchild < n && a[min] > a[lchild]) min = lchild;
	if (rchild < n && a[min] > a[rchild]) min = rchild;
	if (min != i) {
		swap(&a[min], &a[i]);
		adjust(a, min, n);
	}
	return 0;
}

/* 最小堆化 */
static int min_heapify(int *a, const int n)
{
	int i;
	for (i = n - 1; i >= 0; i--)
		adjust(a, i, n);
	return 0;
}
/* 堆排序,a为排序前数组,调用后,a变为已排好序的数组 */
static int heap_sort(int *a, const int n)
{
	int i;
	for (i = 0; i < n; i++) {
		min_heapify(a + i, n - i);
	}
}
int main(int argc, char **argv)
{
	int a[N], i;
	srandom(time(NULL));
	for (i = 0; i < N; i++)
		a[i] = random() % 100;
	for (i = 0; i < N; i++)
		printf("%d ", a[i]);
	printf("\n");
	heap_sort(a, N);
	for (i = 0; i < N; i++)
		printf("%d ", a[i]);
	printf("\n");
	return 0;
}
调用heap_sort即可实现排序。
html、latex、gnuplot特殊字符
symbol html4    latex    gnuplot        ASCII

α α   \alpha     {/Symbol a}    224
β β    \beta      {/Symbol b}    225
&chi χ     \chi       {/Symbol c}
&Chi Χ     \Chi       {/Symbol C}
δ δ   \delta     {/Symbol d}    235
Δ Δ   \Delta     {/Symbol D}
ε ε \epsilon   {/Symbol e}    238
Ε Ε \Epsilon   {/Symbol E}
φ φ     \phi       {/Symbol f}    237
Φ Φ     \Phi       {/Symbol F}    232
γ γ   \gamma     {/Symbol g}
Γ Γ   \Gamma     {/Symbol G}    226
η η     \eta       {/Symbol h}
Η Η     \Eta       {/Symbol H}
ι ι    \iota      {/Symbol i}
Ι Ι    \Iota      {/Symbol I}
κ κ   \kappa     {/Symbol k}
Κ Κ   \Kappa     {/Symbol K}
&lambda λ  \lambda    {/Symbol l}
&Lambda Λ  \Lambda    {/Symbol L}
μ μ      \mu        {/Symbol m}    230
Μ Μ      \Mu        {/Symbol M}
ν ν      \nu        {/Symbol n}
Ν Ν      \Nu        {/Symbol N}
&omicron ο \omicron   {/Symbol o}
&Omicron Ο \Omicron   {/Symbol O}
π π      \pi        {/Symbol p}    227
Π Π      \Pi        {/Symbol P}
θ θ   \theta     {/Symbol q}
Θ Θ   \Theta     {/Symbol Q}    233
ρ ρ     \rho       {/Symbol r}
Ρ Ρ     \Rho       {/Symbol R}
σ σ   \sigma     {/Symbol s}    229
Σ Σ   \Sigma     {/Symbol S}    228
τ τ     \tau       {/Symbol t}    231
Τ Τ     \Tau       {/Symbol T}
υ υ \upsilon   {/Symbol u}
Υ Υ \Upsilon   {/Symbol U}
ω ω   \omega     {/Symbol w}
Ω Ω   \Omega     {/Symbol W}
ξ ξ      \xi        {/Symbol x}
Ξ Ξ      \Xi        {/Symbol X}
ψ ψ     \psi       {/Symbol y}
Ψ Ψ     \Psi       {/Symbol Y}
ζ ζ    \zeta      {/Symbol z}
Ζ Ζ    \Zeta      {/Symbol Z}


&infinity; &infinity \inf       ?             236
           \pm        ?             231
?          \approx    ?             241
?          \sqrt      ?             251
n                                   252
           ^2         ^2            253
∇    \nabla     ?
HTML特殊字符编码对照表
| 特殊符号 | 命名实体 | 十进制编码 | 特殊符号 | 命名实体 | 十进制编码 | 特殊符号 | 命名实体 | 十进制编码 |
| Α | Α | Α | Β | Β | Β | Γ | Γ | Γ |
| Δ | Δ | Δ | Ε | Ε | Ε | Ζ | Ζ | Ζ |
| Η | Η | Η | Θ | Θ | Θ | Ι | Ι | Ι |
| Κ | Κ | Κ | Λ | Λ | Λ | Μ | Μ | Μ |
| Ν | Ν | Ν | Ξ | Ξ | Ξ | Ο | Ο | Ο |
| Π | Π | Π | Ρ | Ρ | Ρ | Σ | Σ | Σ |
| Τ | Τ | Τ | Υ | Υ | Υ | Φ | Φ | Φ |
| Χ | Χ | Χ | Ψ | Ψ | Ψ | Ω | Ω | Ω |
| α | α | α | β | β | β | γ | γ | γ |
| δ | δ | δ | ε | ε | ε | ζ | ζ | ζ |
| η | η | η | θ | θ | θ | ι | ι | ι |
| κ | κ | κ | λ | λ | λ | μ | μ | μ |
| ν | ν | ν | ξ | ξ | ξ | ο | ο | ο |
| π | π | π | ρ | ρ | ρ | ς | ς | ς |
| σ | σ | σ | τ | τ | τ | υ | υ | υ |
| φ | φ | φ | χ | χ | χ | ψ | ψ | ψ |
| ω | ω | ω | ϑ | ϑ | ϑ | ϒ | ϒ | ϒ |
| ϖ | ϖ | ϖ | • | • | • | … | … | … |
| ′ | ′ | ′ | ″ | ″ | ″ | ‾ | ‾ | ‾ |
| ⁄ | ⁄ | ⁄ | ℘ | ℘ | ℘ | ℑ | ℑ | ℑ |
| ℜ | ℜ | ℜ | ™ | ™ | ™ | ℵ | ℵ | ℵ |
| ← | ← | ← | ↑ | ↑ | ↑ | → | → | → |
| ↓ | ↓ | ↓ | ↔ | ↔ | ↔ | ↵ | ↵ | ↵ |
| ⇐ | ⇐ | ⇐ | ⇑ | ⇑ | ⇑ | ⇒ | ⇒ | ⇒ |
| ⇓ | ⇓ | ⇓ | ⇔ | ⇔ | ⇔ | ∀ | ∀ | ∀ |
| ∂ | ∂ | ∂ | ∃ | ∃ | ∃ | ∅ | ∅ | ∅ |
| ∇ | ∇ | ∇ | ∈ | ∈ | ∈ | ∉ | ∉ | ∉ |
| ∋ | ∋ | ∋ | ∏ | ∏ | ∏ | ∑ | ∑ | − |
| − | − | − | ∗ | ∗ | ∗ | √ | √ | √ |
| ∝ | ∝ | ∝ | ∞ | ∞ | ∞ | ∠ | ∠ | ∠ |
| ∧ | ∧ | ⊥ | ∨ | ∨ | ⊦ | ∩ | ∩ | ∩ |
| ∪ | ∪ | ∪ | ∫ | ∫ | ∫ | ∴ | ∴ | ∴ |
| ∼ | ∼ | ∼ | ≅ | ≅ | ≅ | ≈ | ≈ | ≅ |
| ≠ | ≠ | ≠ | ≡ | ≡ | ≡ | ≤ | ≤ | ≤ |
| ≥ | ≥ | ≥ | ⊂ | ⊂ | ⊂ | ⊃ | ⊃ | ⊃ |
| ⊄ | ⊄ | ⊄ | ⊆ | ⊆ | ⊆ | ⊇ | ⊇ | ⊇ |
| ⊕ | ⊕ | ⊕ | ⊗ | ⊗ | ⊗ | ⊥ | ⊥ | ⊥ |
| ⋅ | ⋅ | ⋅ | ⌈ | ⌈ | ⌈ | ⌉ | ⌉ | ⌉ |
| ⌊ | ⌊ | ⌊ | ⌋ | ⌋ | ⌋ | ◊ | ◊ | ◊ |
| ♠ | ♠ | ♠ | ♣ | ♣ | ♣ | ♥ | ♥ | ♥ |
| ♦ | ♦ | ♦ | |   | ¡ | ¡ | ¡ | |
| ¢ | ¢ | ¢ | £ | £ | £ | ¤ | ¤ | ¤ |
| ¥ | ¥ | ¥ | ¦ | ¦ | ¦ | § | § | § |
| ¨ | ¨ | ¨ | © | © | © | ª | ª | ª |
| « | « | « | ¬ | ¬ | ¬ | ­ | ­ | |
| ® | ® | ® | ¯ | ¯ | ¯ | ° | ° | ° |
| ± | ± | ± | ² | ² | ² | ³ | ³ | ³ |
| ´ | ´ | ´ | µ | µ | µ | " | " | " |
| < | < | < | > | > | > | ' | ' |
pdf元数据问题
现在很多人撰写简历、文档喜欢从网上下载一个模板,一般为word类型,修改增加自己的内容后再生成pdf文件,但是有时从网上下载的文档,会附加上一些元数据,主要是一些信息,比如title、keyword、author、subject、version等,使用wps(我使用的是linux版本)的文件,点击属性即可查看。
有时我们可能忘了修改这些元数据(大多数人都会!),然后直接生成pdf文件,这个pdf文件也会带入这些元数据。可以使用pdfinfo命令查看(先安装evince),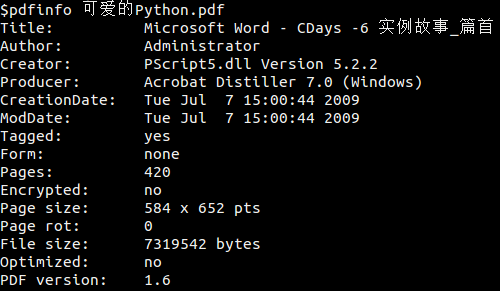
这些元数据可能不是你所希望存在的,如果没有注意这些信息,投递简历时,HR若看到不希望看到的信息,印象肯定大减,尤其是title,使用evince打开时,会显示在标题栏。
修改pdf元数据,可以使用pdfmod命令,但好像不怎么支持中文,改了后会乱码,最好还是记得在word编辑时修改。
当然如果从头都是自己原生的,这个问题就不会存在。
atoi, atof, itoa 实现
今天整nodejs实在不行,npm和nodejs在源上版本不兼容,install一直出问题。于是不想整了。 写了下很久没有写的c代码,好吧。。无聊!在标准库stdlib中以下函数均已实现
       int atoi(const char *nptr);
       long atol(const char *nptr);
       long long atoll(const char *nptr);
       long long atoq(const char *nptr);
       double atof(const char *nptr);
       double strtod(const char *nptr, char **endptr);
       float strtof(const char *nptr, char **endptr);
       long double strtold(const char *nptr, char **endptr);
今天无聊,自己写了几个实现下:
#include <stdio.h>
#include <ctype.h>
#include <string.h>
#include <stdlib.h>
#define MAX_LENGTH 15
void swap(char *a, char *b)
{
	char t = *a;
	*a = *b;
	*b = t;
	return;
}
int atoi(const char *s)
{
	int len = strlen(s);
	int res = 0;
	int i = 0;
	int sign = 0;
	if(s[0] == '-')
		sign = i = 1;
	for (; i < len; ++i) {
		if (!isdigit(s[i])) {
			fprintf(stderr, "%s is not a Integer!\n", s);
			exit(1);
		}
		res *= 10;
		res += (s[i] - '0');
	}
	return sign == 1 ? -res : res;
}
char *itoa(const int n, char *dest)
{
	int m = n;
	int i, j;
	int cur = 0;
	int sign = 0;
	memset(dest, 0, sizeof(char) * MAX_LENGTH);
	if (m < 0) {
		dest[cur++] = '-';
		m *= -1;
		sign = 1;
	}
	while (m) {
		i = m % 10;
		dest[cur++] = '0' + i;
		m /= 10;
	}
	dest[cur] = 0;
	j = strlen(dest) - 1;
	i = sign ? 1 : 0;
	for(; i != j; i++, j--)
		swap(&dest[i], &dest[j]);
	return dest;
}
double atof(const char *s)
{
	int len = strlen(s);
	int i = 0;
	int sign = 0; /* 符号位, 负数1,正数0 */
	int int_part = 0; /* 整数部分 */
	double point_part = 0; /* 小数部分 */
	double res; /* 最后结果数值部分,不包括符号位 */
	if (s[0] == '-')
		sign = i = 1;
	for (; i < len && s[i] != '.'; ++i) {
		if (!isdigit(s[i])) {
			fprintf(stderr, "%s is not a number!\n", s);
			exit(1);
		}
		int_part *= 10;
		int_part += (s[i] - '0');
	}

	double base = 0.1; /* 当前小数位 */
	for (++i; i < len; i++) {
		if (!isdigit(s[i])) {
			fprintf(stderr, "%s is not a number!\n", s);
			exit(1);
		}
		point_part += ((s[i] - '0') * base);
		base *= 0.1;
	}
	res = int_part + point_part;
	return sign ? -res : res;
}
tmux 滚屏
gnome-term 通过鼠标滚动可以滚屏,可是tmux默认鼠标滚动是查看历史命令,相当于方向键的上下。
要想滚屏只需要输入prefix + pageUp,prefix就是默认发送prefix绑定的键,默认为Ctrl + b,然后就可以像使用vi或emacs一样操作,具体取决于配置,比如在查找内容输入 “/” 等。
如果需要开启滚动鼠标启动,可以进入命令模式,即“prefix + :”,然后输入setw mode-mouse on ,可选参数-g,表示是否应用于所有窗口。
如果不想每次输入这么麻烦,可以写入配置文件,
echo "set-window-option -g mode-mouse on" >> ~/.tmux.conf
注意:其实以上方式已经进入了复制模式,因此可以键入空格开始复制,回车确定,q退出。